It’s not exactly news that my eyebrows are barely there and I have to fill them in with pencil. Mostly because I over-plucked them heavily in the 90s, but a little bit because I’ve realised that I actually inherited thin brows from my mum’s side of the family. Thanks genetics!!
It might be news though, that when I was born, I had absolutely no eyelashes at all. Not even one. Luckily for me they started growing a couple of weeks after I was born, and even more luckily, they’re pretty long. The only issue is as they’re really blonde at the tips, they don’t look as long as they ought to.
So I decided to brave the world of home-tinting to try and get brows to be proud of and to get my lashes looking long and luxurious without the aid of mascara. Besides, I’ve coloured my hair loads of times myself, so how hard can it be, right? Right?
I chose the Colorsport 30 day brow tint in dark brown and the Colorsport 30 day mascara dye kit in black and did a patch test 48 hours before I attempted anything, because no one wants an allergic reaction!!

I opted for trying the brow tint first, despite being terrified that it would stain my skin (which it didn’t because the instructions handily say to pop Vaseline around the eyebrows first). I love that the packaging inside the box doubles up as a little mixing bowl so you don’t need to find something round the house to use! I used it to mix a little of the dye cream with a few drops of developer lotion (I hardly have any eyebrows anyway so I only used tiny amounts of each!) and used the plastic stick provided to apply it to my brows.

Here’s a pic of my eyebrow before applying the tint, I make no apologies for the fact I’ve not bothered plucking it first. You’re not meant to pluck your eyebrows at least 72 hours before you intend to put the tint on your brows.
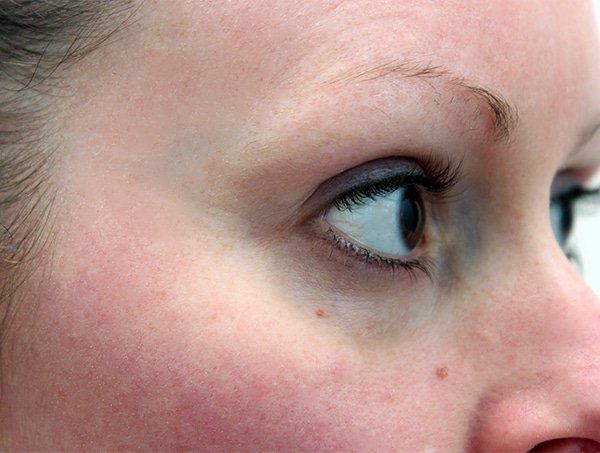
My “during” eyebrow (and yeah, I know this is the other brow, but I did do both, I’m not a complete wierdo!)
I left it on for about 2 minutes (instructions say up to 5 but I was too scared to go that long on my first go) and then wiped it off with warm water on a cotton wool ball.
I couldn’t see any change at all so decided to try again but this time left it on for 5 minutes! Once I’d washed it off, there wasn’t really a huge amount of change, although perhaps my eyebrows are a teeny tiny bit darker now, especially at the end of my eyebrows?

As this went smoothly, (I mean I didn’t exactly get the results I wanted but at least nothing bad happened, like dye everywhere or my face puffing up rapidly) I then tried the eyelash kit. In this kit you get some dye cream and a bottle of developer liquid which you DO NOT mix together. I popped some Vaseline round my eyelids before I started and applied the paper protectors that also come in the kit.
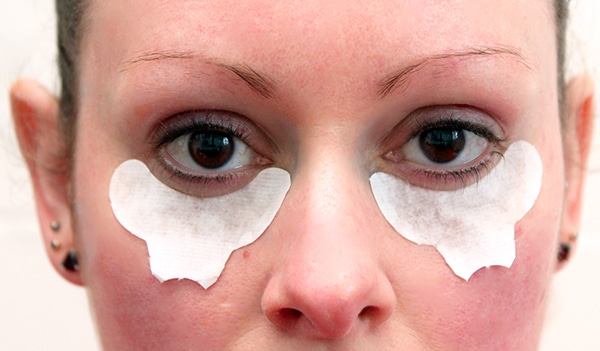
I applied a small amount the developer liquid to my upper eyelashes using a cotton bud. Once I’d left that on for a minute, I used the spoolie to apply the dye cream (which is more of a gel). It was really easy to apply and I left that on for a further minute! Afterwards, I gently removed everything with more warm water and cotton wool balls! The instructions suggested soap. I gave that a go. DO NOT GIVE THAT A GO. IT HURTS!
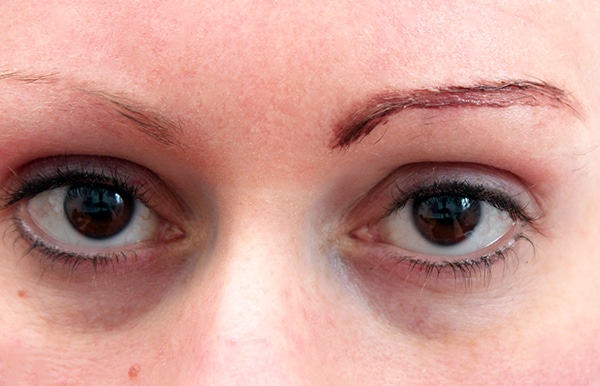
As you can see above, my eyelashes only look as though they go to the top of my eyelid, but they’re actually a lot longer!! As you can see below, the dye took really well and I’m really surprised with the results, especially because the brow kit didn’t do much!

- Value for money: The kits are under a tenner in most stores and you get between 12 and 16 applications from them (depending which kit you get). The results are also meant to last for 30 days, so you’re spending roughly £10 over a year; not bad!!
- Will I use it again?: I’d definitely want to give them both another try, the brow kit mostly because I want it to work! The eyelash kit means I won’t feel weird not wearing mascara quite as much!
- Verdict: 3/5.
Have you ever tinted your brows or lashes before? How did you find the results? Let me know in the comments below 🙂 x
*These products were sent to me to try out but eyebrows, eyelashes and views are my own.

8 Comments
Your eyelashes look incredible!! I’m tempted to do my brows after reading this – did you find the results lasted a month? Hels xx
Thank you! And yes! They’re holding up well and I’ve found that I needed to use a darker brow pencil than I used to! Xx
The lash tint looks amazing, I’m rather tempted to give that a go!
I’ve been playing around with my brows a lot over the last few months thanks to my ever-changing but mostly silver hair. As I’m naturally quite red I looked really weird so I bleached my brows and then used the same grey hair dye as my hair to get them to match. Probably not recommended by producers of dye/bleach but it’s worked pretty well.
I don’t know all the colours they do, but I’d definitely recommend it! It was reall easy to do and it only lasts a month, so if you don’t get on with it, at least it’s not permanent! 🙂
I have blonde eyelashes and brows, from a distance I appear not to have either. However mascara or brow pencils make it too dark. Nightmare! Good to know there’s products out there that can make them show up.
Ah yeah, I’d definitely recommend trying them out, I expect you can get loads of different shades too to match your skin tones 😊
You’re brave! I’d be waaaay to scared to do my brows or lashes, I’d probably poke myself in the eyeball or do something massively wrong. Shame the brow tint didn’t take but lashes are really good though!!
Honestly Aine
Always try anything once, what’s the worst that could happen? I think I mixed it up badly so I’m going to give it another go!