
I thought I’d brighten up my blog with a little bit of colour!
I found this really, really easy tutorial on Wikihow and I thought I’d give it a whirl! I just wish my eyebrow game was as epic as hers!!
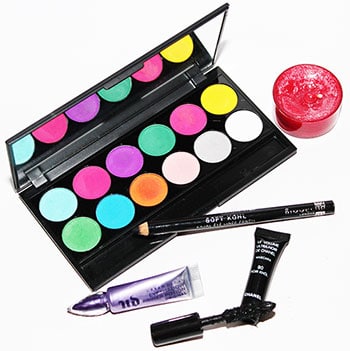
For this look I used:
- Sleek palette (Ultra Mattes V1)
- Rimmel soft Kohl eyeliner
- Chanel mascara
- Urban Decay eyeshadow primer
- Step one: I primed my eyelids and wondered if that step was completely necessary as it felt a little tacky on my eyes.
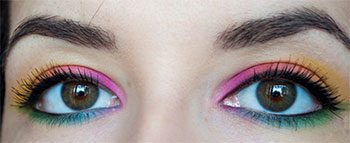
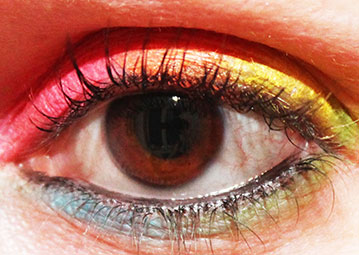
- Step two: I started at the inner corner with the pink shade (top) and went towards the middle of my eyelid.
- Step three: I then added some of the orange shade in the centre of my lid.
- Step four: For the outer corner I added the yellow.
- Step five: I used an angled brush to add the green (bottom left) on my lower lash line.
- Step six: Using the angled brush, I added blue (bottom) to the rest of my lash line towards the inner corner of my eye.
- Step seven: I gently used my blending brush to blend all the colours together.
- Step eight: I finished the look with eyeliner to my lower waterline and a coat of mascara to my upper lashes.

- Instructions: They were really clear to follow and the photos really helped.
- Time: <5 mins.
- Look: It’s a really bright, cheery look and really stands out!
- Would I wear it again?: I live in Brighton so I often go to their annual Pride events, this would be the perfect makeup look to wear. Other than that though, I wouldn’t wear it as an everyday look.
- Verdict: 4/5.
What do you think? Would you wear something this bright? x
7 Comments
It’s not to my personal taste but you’ve recreated the look really well! Do you plan to use it again?
It’s no my thing to be honest, but I love trying out new looks 😁 I might wear it next year for Gay Pride!
How FUN. And that Sleek palette is just perfect for this look. You did great!
Awww, thank you! I really enjoyed this look 😊 x
It really looks amazing
Thank you 😊